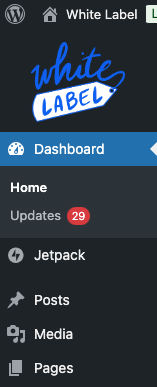
The White Label WordPress plugin includes an easy way for site administrators to add their agency logo or client’s logo to the admin menu. Adding a custom WordPress admin menu logo is a great way to help change the interface to match your business or client’s branding.
This feature is available in both the free version of the plugin and White Label Pro. To begin, install and activate either version of the White Label plugin. There are guides available to help you install White Label or install White Label Pro if you need assistance. You’ll want to load up the plugin’s Menus tab after you have completed installation and activation. This is where you will find the settings for the sidebar menu logo.
Add a WordPress Admin Sidebar Menu Logo
From the Menus tab, you’ll find the Sidebar Menus section. This is where the two settings for this feature are located:

All you need to do is pick the logo you want to use and set its height. We recommend 80-100 pixels, but you can set the height to whatever you wish. When you are done, press the Save Settings button to finish. Immediately, all admin users will see your chosen logo in the WordPress admin’s sidebar menu.

That’s all there is to it. If you want to remove the logo, simply clear the Sidebar Menu Logo field and save your settings again. Every change you make with this feature is instant.
Additional WordPress Menu Options
White Label can do more to admin menus than insert a custom logo. The plugin can help you rename menu choices, hide menus, create your own admin color profile, and much more. You can learn more about these features by reading our documentation. That’s the best way to discover the ways White Label can help you edit the WordPress admin’s menus.