
How to White Label Gravity Forms
Gravity Forms is one of the most popular form building plugins available for WordPress. Most of the WordPress developers we know have Gravity Forms as a staple plugin in their website building strategy. It gives clients the power to quickly, and easily, add and modify all varieties of forms on their websites. For most clients, Gravity Forms is perfect out of the box. Unfortunately, not all clients are equal and sometimes website developers need to modify the Gravity Forms interface. Thankfully, our White Label WordPress plugin can help with that. This article will help you learn all the ways that you can use our plugin to white label Gravity Forms.
Our White Label Plugin
Before we get deeper into, let’s take some time to discuss the White Label plugin. Our plugin was built to make modifying and adjusting the WordPress admin experience simple. There are dozens of features in White Label to help you customize WordPress for your clients. For example, White Label helps you rebrand the WordPress login form and page. You can change menus inside the admin. The plugin lets you build dashboard widgets and modify the dashboard. There are features in White Label to change how plugins are shown to users. In addition, White Label has a set of theme-related features as well. Plus, many more options to make the WordPress admin fit your client’s needs exactly.
Take a look at our features list and the expansive documentation on this site to learn more about White Label. We think it’s the best white label WordPress plugin available. It’s simple and easy to use and makes a great addition to any WordPress developer’s or agency’s toolbox.
Let’s get back to the task on hand: how to white label Gravity Forms.
White Label has a section devoted solely to Gravity Forms. Using these bespoke features, in combination with some other features of our plugin, will let you white label Gravity Forms quickly and easy. In this article, we will walk you through each feature. By the end, you should have a working version of Gravity Forms without anyone using the site actually knowing what form builder plugin is in use.
Please note: Many of the features discussed in this article are only found in White Label Pro. You’ll have to purchase that version of our plugin to have access to many of the features related to white labeling Gravity Forms.
Gravity Forms Branding
White Label has a set of features to help you directly change Gravity Forms branding throughout the WordPress admin.
Hide the Gravity Forms Logo
The easiest way to white label Gravity Forms is to hide its logo throughout the admin. The Gravity Forms logo appears throughout various screens. Most obviously, in a header at the top of each screen in the plugin. You can easily hide the Gravity Forms logo with a click of a checkbox in White Label.

Replace the Gravity Forms Name
In addition to the logo, White Label lets you modify the name of Gravity Forms as it appears on various screens and interface panels. You can change the plural (Gravity Forms) and singular (Gravity Form) appearances of the name by setting your own values.

Gravity Forms Templates
Creating a new form with the Gravity Forms plugin begins with a template popup. This popup is incredibly handy, but it does contain a feature that some people looking to white label Gravity forms might want to remove.
Gravity Forms templates come with a Preview button that links to an external site maintained by the developers of Gravity Forms. In order to white label the plugin, you might want to remove that link from each template. You can do so by checking the box next to Hide Preview Button in White Label’s settings for Gravity Forms.

Gravity Forms Toolbar Links
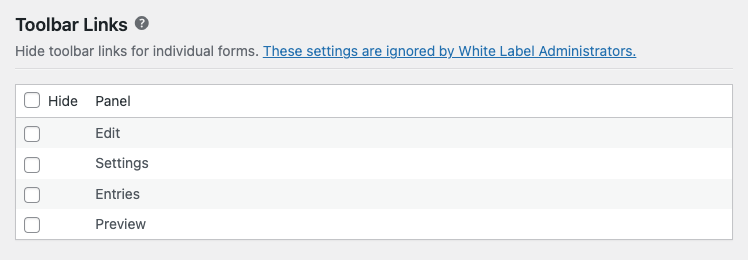
Individual forms contain Gravity Forms toolbar links to several features:
- Edit
- Settings
- Entries
- Preview
White Label lets you hide these links to help control what form information your clients have access to. Simply check the box next to the toolbar link you want to hide. Once you save your settings, those links will be removed.
Gravity Forms Settings
Gravity Forms comes with a comprehensive settings screen. These panels contain branding for Gravity Forms, of course, but also some features you might not want clients to access. Thankfully, White Label can hide the features for you.
Hide Gravity Forms Settings Panels
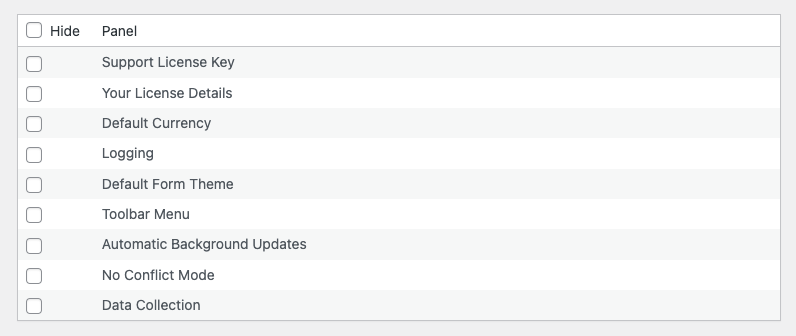
The Gravity Forms Settings screen has individual panels for each part of the plugin you can adjust. White Label has an easy-to-use table, with checkbox, you can use to hide these panels. Simply check the box next to whichever panel you don’t want your clients to see.
Hide Gravity Forms Setting Panel Links
Some of the panels on the Gravity Forms settings screen contain links to external sites. You can hide those links completely by checking the box next to the Hide Links setting in White Label.

Gravity Forms Add-Ons
There is an entire section of the Gravity Forms plugin devoted to first-party and third-party add-ons. These add-ons add functionality to Gravity Forms not provided in the base plugin. Of course, most WordPress developers and agencies want to limit their clients’ access to these kinds of add-ons. White Label includes a feature to help you easily disable access to Gravity Forms add-ons.
The list of official add-ons includes an install button. You can hide this install button, to prevent clients from activating an add-on without you knowing, by checking the corresponding box in White Label.

The certified add-ons list, in the Gravity Forms plugin, includes download links to each third-party developer’s website. Check the box in White Label’s settings too prevent clients from seeing those links.

Gravity Forms Plugin Details
One of White Label’s most popular features is the ability to hide and rename plugin details. You can hide WordPress plugin from your users effortlessly. All you have to do is find the plugin you want to hide on the list inside White Label’s Plugins tab. Check the corresponding box and you’re done.
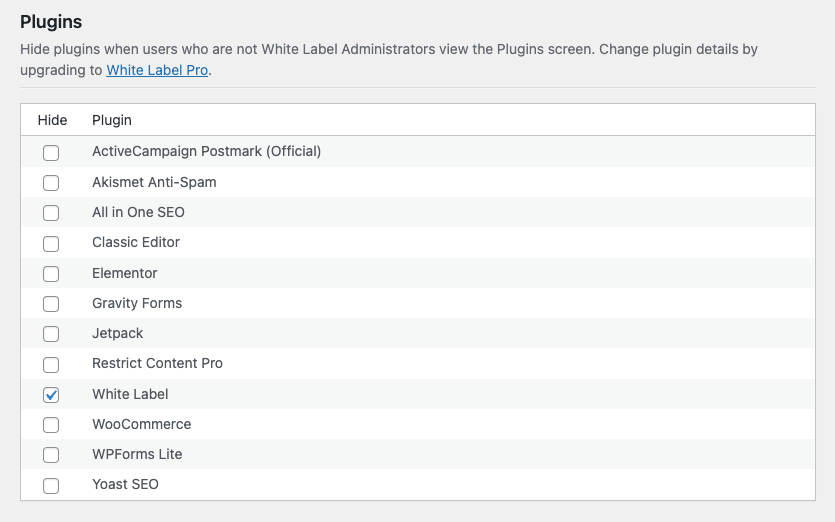
Clients will immediately have the selected plugins hidden from their view when they visit the WordPress admin’s Plugins screen. On top of that, those same clients won’t be notified or nagged whenever your selected plugins have available updates.
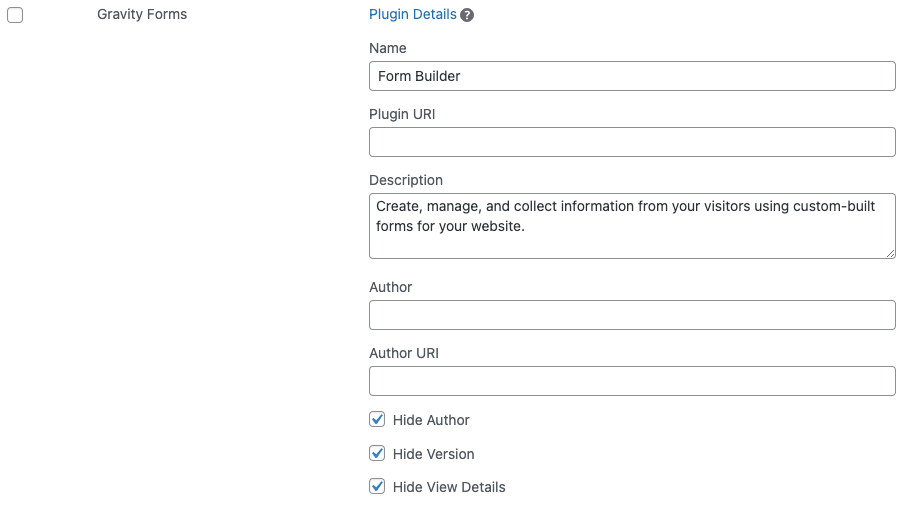
White Label Pro, the premium version of our plugin that is required to access its Gravity Forms features, lets you change WordPress plugin details. This is a great way to take your white labeling of Gravity Forms to the next level. White Label Pro lets you change the following items that are shown on the Plugins screen of the WordPress admin:
- Name
- Plugin URI
- Description
- Author
- Author URI
The following plugin details can be hidden:
- View Details
- Author
- Version
Here’s an example of how you could modify the Gravity Forms plugin details using our plugin:
This is what your users would see with the above settings in place:

Finally, let’s close this discussion by showing you how to modify Gravity Forms menu items in the WordPress admin. White Label has a built-in feature that lets you hide WordPress admin menus from your clients. The interface for this is easy to use. All you do is pick the menu items to hide, check the box next to them, and save. That’s it.
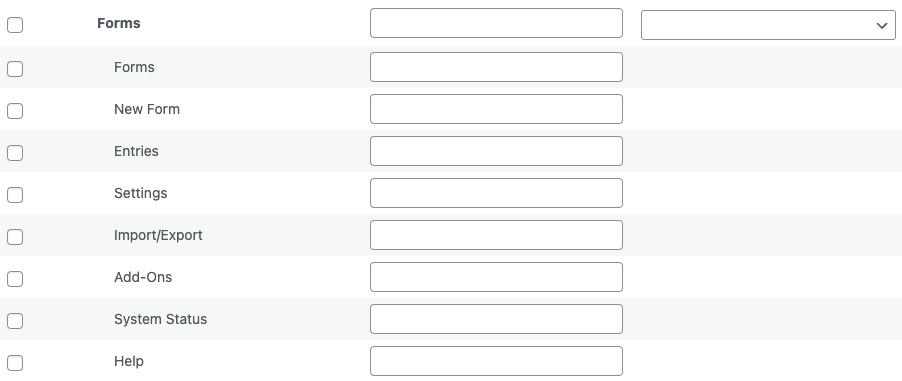
For Gravity Forms, we recommend hiding:
- Add-Ons
- System Status
- Help
These are the three interfaces within Gravity Forms that provide the most outside access and obvious branding.
White Label Pro, required for many of these Gravity Forms white labeling features, also lets you rename WordPress admin menus and change WordPress admin menu icons.
White Label Gravity Forms with Our Plugin
That’s the end of our guide on how to white label Gravity Forms. You can get started with White Label, for free, today. It’s simple to install and offers a ton of features right out of the box. You can then upgrade to White Label Pro if you’d like to access the Gravity Forms features discussed in this article.
Our plugin is the best way to modify the WordPress experience for your clients. Use it to keep the WordPress admin clean, simple, and easy to use. White Label will help you cut down on support requests from clients. It makes troubleshooting problems easier by simplifying what clients have access to. It’s a great plugin for WordPress developers and agencies.

